Custom Domains
Bind a domain you own to a Buckets bucket. Storm verifies that you control the domain before doing anything with it.
This guide covers the whole flow: claiming a domain, proving ownership through a TXT record, pointing your DNS at Storm, and serving live traffic with an automatic TLS certificate.
What you'll need
-
A domain you own (registered, with access to its DNS settings)
-
A Storm Buckets bucket
-
Access to your DNS provider's control panel
You don't need to enable website hosting before claiming a custom domain. The domain claim is independent of serving. You can claim now, enable hosting later.
Custom domains live on the bucket's Static Hosting tab, in the Custom domains section below the serving URL. There is no separate tab for them.
Claim the domain
Open the bucket. Switch to the Static Hosting tab and scroll to Custom domains. Click + Add custom domain. Enter your domain (no scheme, no path, no port). Examples that work:
-
examplesite.ca -
www.examplesite.ca -
blog.example.com
Examples that don't:
-
https://examplesite.ca(no scheme) -
examplesite.ca/blog(no path) -
localhost(must be fully qualified)
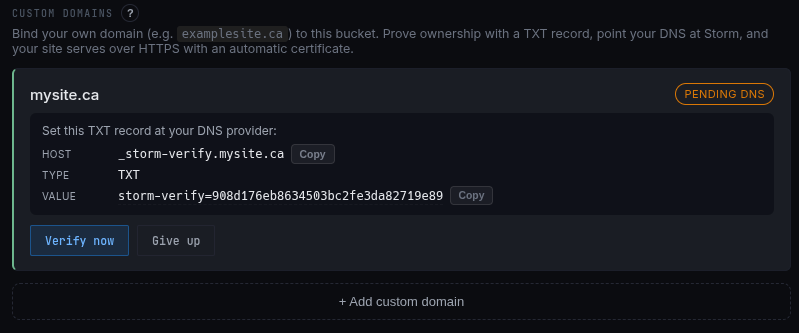
Once claimed, the bucket page shows the domain with a Pending DNS status and a DNS record block. Don't close it. The record is the verification token.
The DNS record
Buckets generates one TXT record per claim. Set it at your DNS provider.
| Field | Value |
|---|---|
| Host | _storm-verify.your-domain.ca |
| Type | TXT |
| Value | storm-verify=<your-token-hex> |
The Host always uses the _storm-verify subdomain prefix. Most DNS panels accept either the full host (_storm-verify.your-domain.ca) or just the subdomain part (_storm-verify). Try the subdomain-only form first.
Provider-specific notes
Cloudflare labels the Host as Name. Set Type to TXT. Paste the value as-is. TTL can be Auto.
Namecheap uses Host with the subdomain-only form (_storm-verify). Type is TXT Record. TTL Automatic.
Hover uses Hostname with the subdomain-only form. Record type TXT.
If your provider isn't listed, the rule is the same everywhere: one TXT record, at the _storm-verify subdomain, with the exact value Buckets generated. Spaces or quotes that the provider auto-wraps around the value are fine; Buckets's verifier strips them.
Verify
After saving the record at your DNS provider, click Verify now in the Buckets dashboard. The check is synchronous. It usually takes a few seconds.
Buckets queries your domain's authoritative nameservers directly, not a recursive resolver. That means a freshly-saved record is visible immediately at your provider, not after the public-resolver cache expires. You should not need to wait for "DNS propagation" unless your provider has slow internal replication.
Verification requires every authoritative nameserver for your domain to return the correct value. If your domain has four nameservers, all four must agree.
When verification fails
Click Verify now again after fixing the issue. Verification is rate-limited to one attempt every 10 seconds per domain.
No TXT record found at _storm-verify.your-domain.ca.
You haven't saved the record yet, or you saved it at the wrong host. Double-check the Host field in your DNS panel. The subdomain-only form (_storm-verify) is usually what providers want.
TXT records exist but none match the expected verification token.
You have a TXT record at the right location, but its value doesn't match. Re-copy the value from the Buckets dashboard and paste it again. Watch for stray quotes or whitespace your provider added.
Still propagating: X of N nameservers see the record.
Some of your nameservers have the record, others don't yet. This usually clears within a few minutes for most DNS providers. Wait, then click Verify again.
No DNS records found for the domain.
Buckets can't find authoritative nameservers for your domain. The domain may not be fully registered, or DNS may be misconfigured at the registrar level. Check your registrar's DNS settings.
DNS lookup timed out.
Buckets's lookup against your nameservers took longer than the budget allows. Try again in a minute. If it persists, your DNS provider may be having issues.
Release a claim
If you typo'd the domain or want to start over, click Give up on the pending row. Confirm. The claim is released and you can re-add the same domain immediately with a fresh verification token.
The released row stays in Storm's records for support purposes. You won't see it in the Custom domains section. It does not block you from re-claiming.
Point your domain at Storm
Once your domain shows DNS verified, Storm has confirmed ownership. The next step is pointing the domain itself at Storm's servers so traffic can flow.
The Custom domains section gives you two options and shows the exact target hostname to use. That hostname depends on your bucket's endpoint, so copy it from the dashboard rather than from this guide. The examples below write it as <endpoint>.buckets.stormdevelopments.ca; the dashboard fills in the real endpoint name.
Option A: CNAME (recommended)
For subdomains (www.example.ca, blog.example.com), and for apex domains (example.ca) if your DNS provider supports ALIAS or ANAME records.
CNAME (or ALIAS) your-domain → <endpoint>.buckets.stormdevelopments.ca
Storm controls the IP behind that hostname. If Storm ever needs to change the IP, you don't have to update anything.
Apex-domain support by provider:
-
Cloudflare uses CNAME flattening automatically. Just set a CNAME at the apex; it Just Works.
-
Hover supports ALIAS records on the apex.
-
Route 53 supports ALIAS records on the apex.
-
Namecheap, GoDaddy (older free plans) typically don't support ALIAS. Use Option B.
Option B: A record (universal)
Works on every DNS provider, every domain shape, including apex domains on providers without ALIAS support.
You need the IP address that the target hostname from the Custom domains section resolves to. Look it up (substitute the real hostname the dashboard shows):
dig +short <endpoint>.buckets.stormdevelopments.ca
Then set an A record at your domain:
A your-domain → <the IP from the dig output>
The trade-off: if Storm changes the IP, you have to update your A record. Storm gives advance notice when this happens, but it does mean a brief manual step on your end.
Activate serving
Once your DNS target is set (give it a minute to propagate, then verify with dig your-domain), click Activate serving in the Custom domains section.
What happens next:
-
Storm dispatches a Caddy config update to your bucket's node. The Custom domains row changes to Certificate provisioning while Storm requests a TLS certificate from Let's Encrypt.
-
Caddy declares your domain as a new site and requests a TLS certificate from Let's Encrypt over HTTP-01.
-
During the brief window between the request and the certificate landing, visitors to your domain see Storm's branded provisioning page ("Provisioning your site on Storm Buckets"). Usually about 30 seconds.
-
Once the certificate is issued, your site is live at
https://your-domain/. The Custom domains row changes to Active and shows the linked URL.
If verification of the cert fails, the row transitions to Failed with an error message. Common cause: DNS not propagated yet, or pointing at the wrong place. Fix the DNS, then claim the domain again to retry.
The status row sits in the same Custom domains section you claimed from, so you watch it move from Pending DNS to DNS verified to Certificate provisioning to Active without leaving the Static Hosting tab.
What's next
Your custom domain serves traffic from your bucket's Storm node, with a real Let's Encrypt certificate, fully automated renewal, and HTTP-to-HTTPS redirect by default. Storm also serves HSTS on your domain, so if you ever move it to a host without HTTPS, browsers that already visited will refuse plain HTTP for up to a year. Phase C territory (currently planning) covers things like wildcard custom domains and customer-controlled certs.
In the meantime, your bucket is also reachable at its Buckets-assigned subdomain. See Static Hosting for the Storm-managed serving URL.